Usage Overview
Paperless is an application that manages your personal documents. With the help of a document scanner (see Scanner recommendations), paperless transforms your wieldy physical document binders into a searchable archive and provides many utilities for finding and managing your documents.
Terms and definitions
Paperless essentially consists of two different parts for managing your documents:
The consumer watches a specified folder and adds all documents in that folder to paperless.
The web server provides a UI that you use to manage and search for your scanned documents.
Each document has a couple of fields that you can assign to them:
A Document is a piece of paper that sometimes contains valuable information.
The correspondent of a document is the person, institution or company that a document either originates form, or is sent to.
A tag is a label that you can assign to documents. Think of labels as more powerful folders: Multiple documents can be grouped together with a single tag, however, a single document can also have multiple tags. This is not possible with folders. The reason folders are not implemented in paperless is simply that tags are much more versatile than folders.
A document type is used to demarcate the type of a document such as letter, bank statement, invoice, contract, etc. It is used to identify what a document is about.
The date added of a document is the date the document was scanned into paperless. You cannot and should not change this date.
The date created of a document is the date the document was initially issued. This can be the date you bought a product, the date you signed a contract, or the date a letter was sent to you.
The archive serial number (short: ASN) of a document is the identifier of the document in your physical document binders. See The recommended workflow below.
The content of a document is the text that was OCR’ed from the document. This text is fed into the search engine and is used for matching tags, correspondents and document types.
Frontend overview
Warning
TBD. Add some fancy screenshots!
Adding documents to paperless
Once you’ve got Paperless setup, you need to start feeding documents into it. When adding documents to paperless, it will perform the following operations on your documents:
OCR the document, if it has no text. Digital documents usually have text, and this step will be skipped for those documents.
Paperless will create an archiveable PDF/A document from your document. If this document is coming from your scanner, it will have embedded selectable text.
Paperless performs automatic matching of tags, correspondents and types on the document before storing it in the database.
Hint
This process can be configured to fit your needs. If you don’t want paperless
to create archived versions for digital documents, you can configure that by
configuring PAPERLESS_OCR_MODE=skip_noarchive. Please read the
relevant section in the documentation.
Note
No matter which options you choose, Paperless will always store the original document that it found in the consumption directory or in the mail and will never overwrite that document. Archived versions are stored alongside the original versions.
The consumption directory
The primary method of getting documents into your database is by putting them in the consumption directory. The consumer runs in an infinite loop looking for new additions to this directory and when it finds them, it goes about the process of parsing them with the OCR, indexing what it finds, and storing it in the media directory.
Getting stuff into this directory is up to you. If you’re running Paperless on your local computer, you might just want to drag and drop files there, but if you’re running this on a server and want your scanner to automatically push files to this directory, you’ll need to setup some sort of service to accept the files from the scanner. Typically, you’re looking at an FTP server like Proftpd or a Windows folder share with Samba.
Dashboard upload
The dashboard has a file drop field to upload documents to paperless. Simply drag a file onto this field or select a file with the file dialog. Multiple files are supported.
Mobile upload
The mobile app over at https://github.com/qcasey/paperless_share allows Android users to share any documents with paperless. This can be combined with any of the mobile scanning apps out there, such as Office Lens.
Furthermore, there is the Paperless App as well, which not only has document upload, but also document browsing and download features.
IMAP (Email)
You can tell paperless-ng to consume documents from your email accounts. This is a very flexible and powerful feature, if you regularly received documents via mail that you need to archive. The mail consumer can be configured by using the admin interface in the following manner:
Define e-mail accounts.
Define mail rules for your account.
These rules perform the following:
Connect to the mail server.
Fetch all matching mails (as defined by folder, maximum age and the filters)
Check if there are any consumable attachments.
If so, instruct paperless to consume the attachments and optionally use the metadata provided in the rule for the new document.
If documents were consumed from a mail, the rule action is performed on that mail.
Paperless will completely ignore mails that do not match your filters. It will also only perform the action on mails that it has consumed documents from.
The actions all ensure that the same mail is not consumed twice by different means. These are as follows:
Delete: Immediately deletes mail that paperless has consumed documents from. Use with caution.
Mark as read: Mark consumed mail as read. Paperless will not consume documents from already read mails. If you read a mail before paperless sees it, it will be ignored.
Flag: Sets the ‘important’ flag on mails with consumed documents. Paperless will not consume flagged mails.
Move to folder: Moves consumed mails out of the way so that paperless wont consume them again.
Caution
The mail consumer will perform these actions on all mails it has consumed documents from. Keep in mind that the actual consumption process may fail for some reason, leaving you with missing documents in paperless.
Note
With the correct set of rules, you can completely automate your email documents. Create rules for every correspondent you receive digital documents from and paperless will read them automatically. The default action “mark as read” is pretty tame and will not cause any damage or data loss whatsoever.
You can also setup a special folder in your mail account for paperless and use your favorite mail client to move to be consumed mails into that folder automatically or manually and tell paperless to move them to yet another folder after consumption. It’s up to you.
Note
Paperless will process the rules in the order defined in the admin page.
You can define catch-all rules and have them executed last to consume any documents not matched by previous rules. Such a rule may assign an “Unknown mail document” tag to consumed documents so you can inspect them further.
Paperless is set up to check your mails every 10 minutes. This can be configured on the ‘Scheduled tasks’ page in the admin.
REST API
You can also submit a document using the REST API, see POSTing documents for details.
Best practices
Paperless offers a couple tools that help you organize your document collection. However, it is up to you to use them in a way that helps you organize documents and find specific documents when you need them. This section offers a couple ideas for managing your collection.
Document types allow you to classify documents according to what they are. You can define types such as “Receipt”, “Invoice”, or “Contract”. If you used to collect all your receipts in a single binder, you can recreate that system in paperless by defining a document type, assigning documents to that type and then filtering by that type to only see all receipts.
Not all documents need document types. Sometimes its hard to determine what the type of a document is or it is hard to justify creating a document type that you only need once or twice. This is okay. As long as the types you define help you organize your collection in the way you want, paperless is doing its job.
Tags can be used in many different ways. Think of tags are more versatile folders or binders. If you have a binder for documents related to university / your car or health care, you can create these binders in paperless by creating tags and assigning them to relevant documents. Just as with documents, you can filter the document list by tags and only see documents of a certain topic.
With physical documents, you’ll often need to decide which folder the document belongs to. The advantage of tags over folders and binders is that a single document can have multiple tags. A physical document cannot magically appear in two different folders, but with tags, this is entirely possible.
Hint
This can be used in many different ways. One example: Imagine you’re working on a particular task, such as signing up for university. Usually you’ll need to collect a bunch of different documents that are already sorted into various folders. With the tag system of paperless, you can create a new group of documents that are relevant to this task without destroying the already existing organization. When you’re done with the task, you could delete the tag again, which would be equal to sorting documents back into the folder they belong into. Or keep the tag, up to you.
All of the logic above applies to correspondents as well. Attach them to documents if you feel that they help you organize your collection.
When you’ve started organizing your documents, create a couple saved views for document collections you regularly access. This is equal to having labeled physical binders on your desk, except that these saved views are dynamic and simply update themselves as you add documents to the system.
Here are a couple examples of tags and types that you could use in your collection.
An
inboxtag for newly added documents that you haven’t manually edited yet.A tag
carfor everything car related (repairs, registration, insurance, etc)A tag
todofor documents that you still need to do something with, such as reply, or perform some task online.A tag
bank account xfor all bank statement related to that account.A tag
mailfor anything that you added to paperless via its mail processing capabilities.A tag
missing_metadatawhen you still need to add some metadata to a document, but can’t or don’t want to do this right now.
Searching
Paperless offers an extensive searching mechanism that is designed to allow you to quickly find a document you’re looking for (for example, that thing that just broke and you bought a couple months ago, that contract you signed 8 years ago).
When you search paperless for a document, it tries to match this query against your documents. Paperless will look for matching documents by inspecting their content, title, correspondent, type and tags. Paperless returns a scored list of results, so that documents matching your query better will appear further up in the search results.
By default, paperless returns only documents which contain all words typed in the search bar. However, paperless also offers advanced search syntax if you want to drill down the results further.
Matching documents with logical expressions:
shopname AND (product1 OR product2)
Matching specific tags, correspondents or types:
type:invoice tag:unpaid
correspondent:university certificate
Matching dates:
created:[2005 to 2009]
added:yesterday
modified:today
Matching inexact words:
produ*name
Note
Inexact terms are hard for search indexes. These queries might take a while to execute. That’s why paperless offers auto complete and query correction.
All of these constructs can be combined as you see fit. If you want to learn more about the query language used by paperless, paperless uses Whoosh’s default query language. Head over to Whoosh query language. For details on what date parsing utilities are available, see Date parsing.
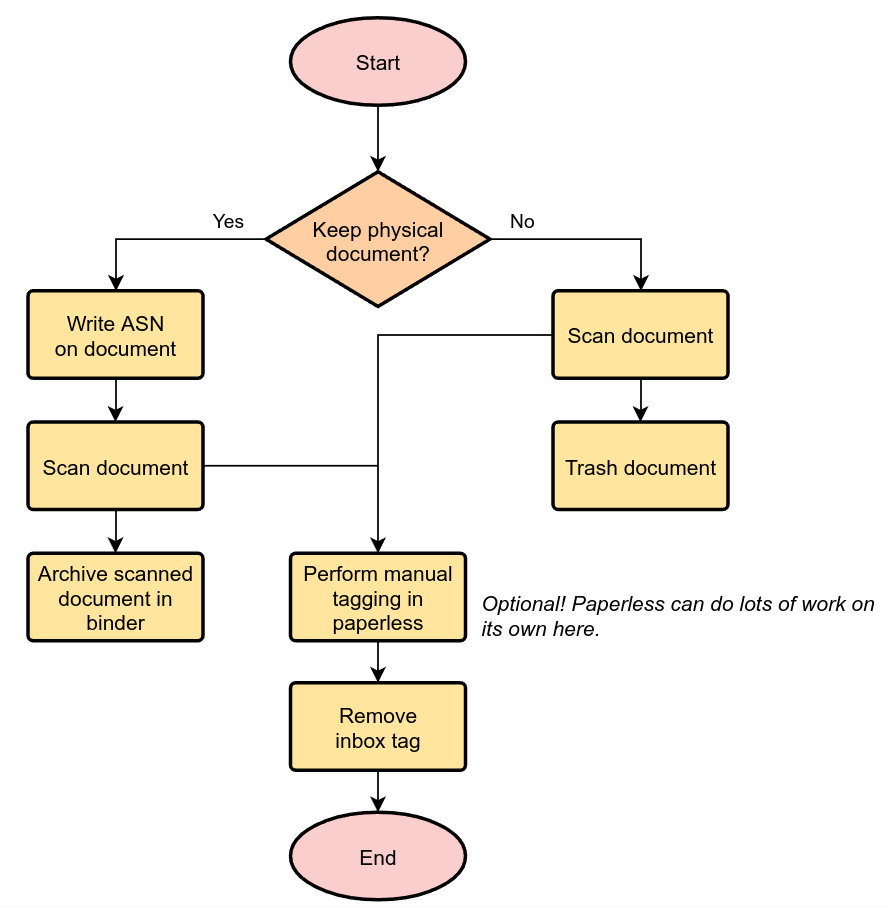
The recommended workflow
Once you have familiarized yourself with paperless and are ready to use it for all your documents, the recommended workflow for managing your documents is as follows. This workflow also takes into account that some documents have to be kept in physical form, but still ensures that you get all the advantages for these documents as well.
The following diagram shows how easy it is to manage your documents.
Preparations in paperless
Create an inbox tag that gets assigned to all new documents.
Create a TODO tag.
Processing of the physical documents
Keep a physical inbox. Whenever you receive a document that you need to archive, put it into your inbox. Regularly, do the following for all documents in your inbox:
For each document, decide if you need to keep the document in physical form. This applies to certain important documents, such as contracts and certificates.
If you need to keep the document, write a running number on the document before scanning, starting at one and counting upwards. This is the archive serial number, or ASN in short.
Scan the document.
If the document has an ASN assigned, store it in a single binder, sorted by ASN. Don’t order this binder in any other way.
If the document has no ASN, throw it away. Yay!
Over time, you will notice that your physical binder will fill up. If it is full, label the binder with the range of ASNs in this binder (i.e., “Documents 1 to 343”), store the binder in your cellar or elsewhere, and start a new binder.
The idea behind this process is that you will never have to use the physical binders to find a document. If you need a specific physical document, you may find this document by:
Searching in paperless for the document.
Identify the ASN of the document, since it appears on the scan.
Grab the relevant document binder and get the document. This is easy since they are sorted by ASN.
Processing of documents in paperless
Once you have scanned in a document, proceed in paperless as follows.
If the document has an ASN, assign the ASN to the document.
Assign a correspondent to the document (i.e., your employer, bank, etc) This isn’t strictly necessary but helps in finding a document when you need it.
Assign a document type (i.e., invoice, bank statement, etc) to the document This isn’t strictly necessary but helps in finding a document when you need it.
Assign a proper title to the document (the name of an item you bought, the subject of the letter, etc)
Check that the date of the document is correct. Paperless tries to read the date from the content of the document, but this fails sometimes if the OCR is bad or multiple dates appear on the document.
Remove inbox tags from the documents.
Hint
You can setup manual matching rules for your correspondents and tags and paperless will assign them automatically. After consuming a couple documents, you can even ask paperless to learn when to assign tags and correspondents by itself. For details on this feature, see Matching tags, correspondents and document types.
Task management
Some documents require attention and require you to act on the document. You may take two different approaches to handle these documents based on how regularly you intent to use paperless and scan documents.
If you scan and process your documents in paperless regularly, assign a TODO tag to all scanned documents that you need to process. Create a saved view on the dashboard that shows all documents with this tag.
If you do not scan documents regularly and use paperless solely for archiving, create a physical todo box next to your physical inbox and put documents you need to process in the TODO box. When you performed the task associated with the document, move it to the inbox.